Develop a Fiori app using the ABAP RESTful Application Programming Model (RAP)
Introduction
You can use this guide to learn how to develop a Fiori app using the ABAP RESTful Application Programming Model (RAP).
Step 1: Create a database table
Open ABAP Development Tools (ADT) and select your ABAP cloud project.
Now, choose File • New • Other from the main menu. In the dialog box that appears (see Figure 1.1), choose ABAP • Dictionary • Database Table.
Confirm your selection by choosing Next.

Figure 1.1 Selecting the creation of a database table
In the next dialog step, enter the project, the package, the name of the database table and its description (see Figure 1.2). Choose Next to confirm your entries.
This opens the editor. You'll create a database table to expose data about suppliers. Enter the same data as depicted in Listing 1.1.

Figure 1.2 Creating a database table
@EndUserText.label : 'Supplier Master (General Section)'
@AbapCatalog.enhancement.category : #NOT_EXTENSIBLE
@AbapCatalog.tableCategory : #TRANSPARENT
@AbapCatalog.deliveryClass : #A
@AbapCatalog.dataMaintenance : #RESTRICTED
define table zdt_lfa1 {
  key client : mandt not null;
  key supplier_id : sysuuid_x16 not null;
  lifnr : abap.char(10) not null;
  name1 : abap.char(35);
  created_by : syuname;
  created_at : timestampl;
  last_changed_by : syuname;
  last_changed_at : timestampl;
  local_last_changed_at : timestampl;
}
Listing 1.1 Database table ZDT_LFA1
Step 2: Create a CDS DDIC-based view
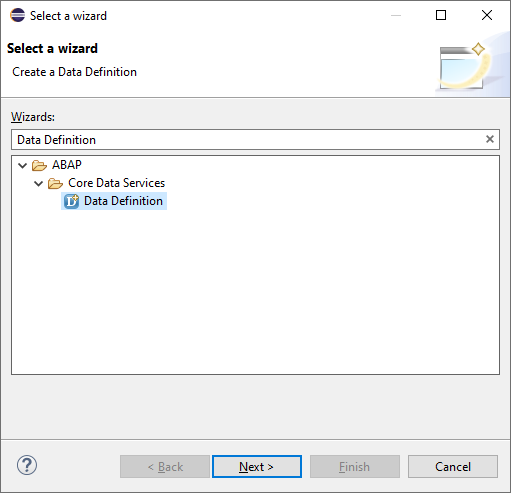
Choose File • New • Other from the main menu. In the dialog box that appears (see Figure 2.1), choose ABAP • Core Data Services • Data Definition.
Confirm your selection by choosing Next.

Figure 2.1 First dialog step when creating a new data definition
In the next dialog step, enter the project, the package, the name of the data definition and its description (see Figure 2.2). Choose Next to confirm your entries.

Figure 2.2 Creating a data definition
Now, choose the template Define View. Confirm your selection by choosing Finish (see Figure 2.3). This opens the CDS editor. Enter the same data as depicted in Listing 2.1.

Figure 2.3 Selecting a template
@AbapCatalog.compiler.compareFilter: true
@AbapCatalog.preserveKey: true
@AbapCatalog.sqlViewName: 'ZI_SUPPLIER_CDS'
@AccessControl.authorizationCheck: #NOT_REQUIRED
@EndUserText.label: 'Supplier'
@Search.searchable: true
define root view ZI_Supplier
  as select from zdt_lfa1 {

  key supplier_id as SupplierId,

  @EndUserText.label: 'Supplier'
  @ObjectModel.text.element: ['SupplierName']
  lifnr as Supplier,

  @EndUserText.label: 'Name of Supplier'
  @Search.defaultSearchElement: true
  name1 as SupplierName,

  @Semantics.user.createdBy: true
  created_by as CreatedBy,

  @Semantics.systemDateTime.createdAt: true
  created_at as CreatedAt,

  @Semantics.user.lastChangedBy: true
  last_changed_by as LastChangedBy,

  @Semantics.systemDateTime.lastChangedAt: true
  last_changed_at as LastChangedAt,

  @Semantics.systemDateTime.localInstanceLastChangedAt: true
  local_last_changed_at as LocalLastChangedAt
}
Listing 2.1 CDS view ZI_Supplier
Step 3: Create a CDS projection view
Choose File • New • Other from the main menu. In the dialog box that appears (see Figure 3.1), choose ABAP • Core Data Services • Data Definition.
Confirm your selection by choosing Next.

Figure 3.1 First dialog step when creating a new data definition
In the next dialog step, enter the project, the package, the name of the data definition and its description (see Figure 3.2). Choose Next to confirm your entries.

Figure 3.2 Creating a data definition
Now, choose the template Define Projection View. Confirm your selection by choosing Finish (see Figure 3.3). This opens the CDS editor. Enter the same data as depicted in Listing 3.1.

Figure 3.3 Selecting a template
@AccessControl.authorizationCheck: #NOT_REQUIRED
@EndUserText.label: 'Supplier'
@Metadata.allowExtensions: true
@ObjectModel.semanticKey: ['Supplier']
@Search.searchable: true
define root view entity ZC_Supplier
  provider contract transactional_query
  as projection on ZI_Supplier
{
  key SupplierId,
  Supplier,
  SupplierName

}
Listing 3.1 CDS projection view ZC_Supplier
Step 4: Create a metadata extension
Choose File • New • Other from the main menu. In the dialog box that appears (see Figure 4.1), choose ABAP • Core Data Services • Metadata Extension.
Confirm your selection by choosing Next.

Figure 4.1 First dialog step when creating a new metadata extension
In the next dialog step, enter the project, the package, the name of the metadata extension and its description (see Figure 4.2). Choose Next to confirm your entries.

Figure 4.2 Creating a metadata extension
Now, choose the template Annotate View. Confirm your selection by choosing Finish (see Figure 4.3). This opens the editor. Enter the same data as depicted in Listing 4.1.

Figure 4.3 Selecting a template
@Metadata.layer: #CORE
@Search.searchable:true

@UI.headerInfo: {
  title: {
    type: #STANDARD, value: 'Supplier'
  },

  typeName: 'Display Supplier',
  typeNamePlural: 'Suppliers'
}

@UI.presentationVariant: [{ sortOrder: [{ by: 'Supplier', direction: #ASC }], visualizations: [{ type: #AS_LINEITEM }] }]
annotate view ZC_Supplier with
{
  @UI.facet: [{
    id:'GeneralInformationCollectionFacet',
    label:'General Information',
    purpose: #STANDARD,
    type:#COLLECTION
  },

  {
    id:'FieldGroupReferenceFacet1',
    label: 'General Data',
    parentId: 'GeneralInformationCollectionFacet',
    purpose: #STANDARD,
    targetQualifier: 'FieldGroup1',
    type:#FIELDGROUP_REFERENCE
  }]

  @Search.defaultSearchElement: true
  @UI.lineItem: [{ position: 10, importance: #HIGH, label: 'Supplier' }]
  Supplier;

  @Search.defaultSearchElement: true
  @UI.fieldGroup: [{ position: 20, label: 'Name of Supplier', qualifier: 'FieldGroup1' }]
  @UI.lineItem: [{ position: 20, importance: #HIGH, label: 'Name of Supplier' }]
  SupplierName;
}
Listing 4.1 Metadata extension ZC_Supplier
Step 5: Create a behavior definition for the base view
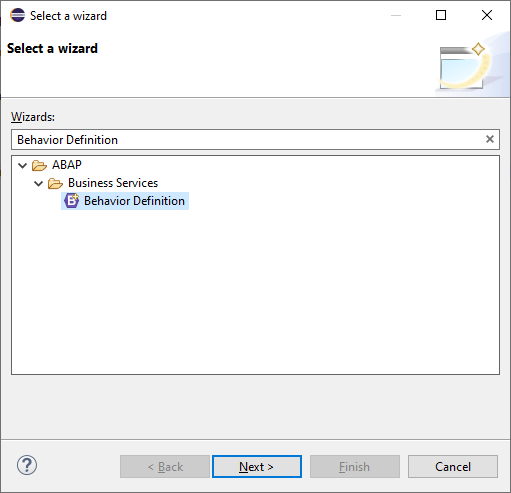
Choose File • New • Other from the main menu. In the dialog box that appears (see Figure 5.1), choose ABAP • Business Services • Behavior Definition.
Confirm your selection by choosing Next.

Figure 5.1 First dialog step when creating a new behavior definition
In the next dialog step, enter the project, the package, the description and the root entity (see Figure 5.2). Choose Next to confirm your entries. This opens the editor. Enter the same data as depicted in Listing 5.1.

Figure 5.2 Creating a behavior definition
managed implementation in class ZBP_I_Supplier unique;
//strict;

define behavior for ZI_Supplier alias Supplier
persistent table zdt_lfa1
lock master
//authorization master ( instance )
etag master LastChangedAt
{
  mapping for zdt_lfa1
  {
    SupplierId = supplier_id;
    Supplier = lifnr;
    SupplierName = name1;
    CreatedBy = created_by;
    CreatedAt = created_at;
    LastChangedBy = last_changed_by;
    LastChangedAt = last_changed_at;
    LocalLastChangedAt = local_last_changed_at;
  }

  field ( readonly, numbering : managed ) SupplierId;

  create;
  update;
  delete;

  determination setAccountNumber on save { create; }
}
Listing 5.1 Behavior definition for ZI_Supplier
Step 6: Create a behavior definition for the projection view
Choose File • New • Other from the main menu. In the dialog box that appears (see Figure 6.1), choose ABAP • Business Services • Behavior Definition.
Confirm your selection by choosing Next.

Figure 6.1 First dialog step when creating a new behavior definition
In the next dialog step, enter the project, the package, the description and the root entity (see Figure 6.2). Choose Next to confirm your entries. This opens the editor. Enter the same data as depicted in Listing 6.1.

Figure 6.2 Creating a behavior definition
projection;
//strict;

define behavior for ZC_Supplier //alias <alias_name>
{
  use create;
  use update;
  use delete;
}
Listing 6.1 Behavior definition for ZC_Supplier
Step 7: Create a behavior implementation
Enter the project, the package and the description (see Figure 7.1). Choose Next to confirm your entries. This opens the editor. Enter the same data as depicted in Listing 7.1.

Figure 7.1 Creating a behavior implementation
CLASS lhc_supplier DEFINITION INHERITING FROM cl_abap_behavior_handler.

  PRIVATE SECTION.

    METHODS setAccountNumber FOR DETERMINE ON SAVE
      IMPORTING keys FOR Supplier~setAccountNumber.

ENDCLASS.

CLASS lhc_supplier IMPLEMENTATION.

  METHOD setAccountNumber.
    READ ENTITIES OF ZI_Supplier IN LOCAL MODE
      ENTITY Supplier
      ALL FIELDS WITH CORRESPONDING #( keys )
      RESULT DATA(suppliers).

    SELECT SINGLE FROM zdt_lfa1 FIELDS MAX( lifnr ) INTO @DATA(account_number).

    MODIFY ENTITIES OF ZI_Supplier IN LOCAL MODE
      ENTITY Supplier
        UPDATE FIELDS ( Supplier )
        WITH VALUE #( FOR supplier IN suppliers INDEX INTO table_index (
          %key = supplier-%key
          Supplier = account_number + table_index )
        )
        REPORTED DATA(reported_data).
  ENDMETHOD.

ENDCLASS.
Listing 7.1 Behavior implementation for ZI_Supplier
Step 8: Develop a Fiori app with SAP Business Application Studio
Open SAP Business Application Studio.
Choose View • Find Command from the main menu. Choose Fiori: Open Application Generator.
Now, choose the List Report Object Page floorplan. Enter the application type (see Figure 8.1). Choose Next to confirm your entries.

Figure 8.1 Choosing the floorplan for your application
Enter the data source, the system and the service (see Figure 8.2). Choose Next to confirm your entries.

Figure 8.2 Configuring the data source and selecting a service
Enter the main entity (see Figure 8.3). Choose Next to confirm your entry.

Figure 8.3 Configuring the selected service
Enter the module name and the application title (see Figure 8.4). Choose Next to confirm your entries.

Figure 8.4 Configuring the main project attributes
Enter the target, the destination, the name, the package and the transport request (see Figure 8.5). Choose Next to confirm your entries.

Figure 8.5 Configuring the deployment settings
Enter the semantic object, the action and the title (see Figure 8.6). Choose Next to confirm your entries.

Figure 8.6 Configuring the Fiori Launchpad settings
In a command line, execute the following command:
npm run deploy
Step 9: Create an IAM app
Open ABAP Development Tools (ADT) and select your ABAP cloud project.
Choose File • New • Other from the main menu. In the dialog box that appears (see Figure 9.1), choose ABAP • Cloud Identity and Access Management • IAM App.
Confirm your selection by choosing Next.

Figure 9.1 First dialog step when creating a new IAM app
In the next dialog step, enter the project, the package, the name, the description and the application type (see Figure 9.2). Choose Next to confirm your entries.

Figure 9.2 Creating an IAM app
Select the Services tab. Add the required services to the app by choosing Insert, selecting a service type, entering a service name (see Figure 9.3).
Confirm your selection by choosing OK.

Figure 9.3 Adding a service
Choose File • New • Other from the main menu. In the dialog box that appears (see Figure 9.4), choose ABAP • Cloud Identity and Access Management • Business Catalog. Confirm your selection by choosing Next.

Figure 9.4 First dialog step when creating a new business catalog
In the next dialog step, enter the project, the package, the name and the description (see Figure 9.5). Choose Next to confirm your entries.

Figure 9.5 Creating a business catalog
Select Apps tab and add a new one. Enter the project, the package and the IAM app (see Figure 9.6). Choose Next to confirm your entries.

Figure 9.6 Creating a business catalog app assignment
Step 10: Test yourself
Go back to SAP Business Application Studio. In a command line, execute the following command:
npm run deploy
Finally, open the URL displayed in the terminal in a browser.
Summary
In this tutorial, you learned about developing a Fiori app using the ABAP RESTful Application Programming Model (RAP).
